Getting Started
The following is a sample of the a writing project I had completed for a toy company. Names, certain details, and UI have been changed.
To get the best out of Good Guy, including games and bedtime routine content, you’ll need to install the Good Guy mobile app. Take a look below for our how-to instructions.
Step 1: Install the Good Guy Mobile App
The Good Guy mobile app is available for iOS and Android devices.
System Requirements
To use the Good Guy mobile app, you’ll need the following:
| Android | iOS | |
|---|---|---|
| OS Version | Android 5.0 | iOS 12 |
| Space | 200MB | 200MB |
| RAM | 8GB | 8GB |
| Connectivity | WIFI and Bluetooth Required | Wifi and Bluetooth Required |
The Good Guy mobile app is designed for mobile phones. Tablets are not supported.
Installation
Step 1: Install the App On Your Device
You can find the Good Guy companion app on your mobile device’s app store or you can select one of the following links from your mobile device:
![]()

Step 2: Create Your Good Guy Account
Once you have the software installed, it’s time to create a Good Guy account. This account will help you manage your family contacts, as well as any Good Guy smart companions you have.
If you’ve been invited to another Good Guy account as a Villager, please follow the instructions in the email you received.
Here’s how to create an account:
- From the home screen, tap Create a new account.
- Choose how you would like to log in (email, Google, Facebook, or Apple)
- If you chose email/password: enter your name, email, phone number, and password to go with your account.
- If you choose to create an account through Google, Facebook, or Apple: tap the link and log in. We’ll add details from your account to Good Guy.
- Tap Create Account to complete setup.
Password requirements
To protect your account, our passwords must be at least 8 characters long and have at least one capital letter and symbol ($, %, ^, &, etc.)
For example: B3stFr!enD
Step 3: Review Our Terms of Use and Allow Permissions
Terms of use
We’ve outlined our terms of use to let you know how we expect Good Guy to be used and what you can expect from us. We’ve also detailed a privacy policy that lets you know what data we collect and how we use it. Some key points:
- We take every available measure to ensure your Good Guy is secure and private. We provide regular security updates to keep your Good Guy safe.
- We will never sell your data for profit. When using third parties, we remove all identifying information.
- You can delete your account at any time. When you delete your account, we’ll remove any data tagged to your family from our servers.
Review our Privacy Policy here.
Review our Terms and Conditions here.
Set Permissions
The Good Guy app requires access to some features on your mobile device to communicate with your Good Guy doll. Tap Allow to provide us with those permissions.
Do you need these permissions?
Good Guy can be a great play buddy for your child right out of the box; however, we need an active internet and Bluetooth connection for you to fully use Good Guy’s features. These features include:
- Managing the Good Guy smart companion from your phone.
- Saving or updating a bedtime routine.
- Tracking your child’s Day Stars progress.
- Downloading new content onto your Good Guy.
- Installing important updates on your Good Guy.
You can opt out of network and Bluetooth permissions. Just note that you will not have access to all of the available content or features without it.
Step 4: Connect Your Good Guy
Now that we have the permissions we need, it’s time to link your Good Guy to your account.
- Tap Yes, I do! when asked if you have your Good Guy with you. We’ll scan using Bluetooth to find a nearby Good Guy. NOTE: We need Bluetooth to be enabled on your mobile device for us to find your Good Guy.
- When we’ve found a Good Guy, their cheeks will begin blinking. If this is the correct Good Guy, tap Pair with Good Guy.
- Once successfully paired, select the wifi network Good Guy should use from the Available networks dropdown, then enter the network password. Once added, tap Share network with Good Guy.
- Finally, select the data options you are comfortable sharing with us and tap next.
Why Do You Need This?
For more information for why we need these details, Check out our FAQ page.
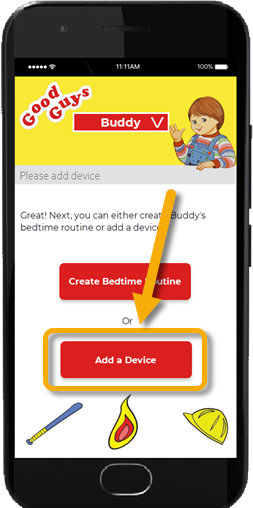
I don’t have my Good Guy yet!
If you don t have a Good Guy to connect yet, tap No, not yet when asked if you have your Good Guy with you. We’ll skip ahead to the next step.
If you skip the Good Guy setup step, you can always add your Good Guy by tapping Add a device from the Dashboard or the Device List from the navigation menu.
Step 5: Help Good Guy Get To Know Your Child
To get the best experience from Good Guy, we ll need to know a bit about your child.
- First name helps Good Guy refer to your child by their own name.
- Birthday helps us set your child’s ideal bedtime routine and milestones based on their age.
Once input, tap Save & view dashboard to save your changes. Your Good Guy is now set up and ready to provide the best daytime and nighttime experience for your child.
Optional: Customize Your Bedtime Routine
Good Guy recommends an optimal bedtime experience for your child during set-up. If you’d like to customize your bedtime, tap Create bedtime routine from the Dashboard. From here, you can select when your child should be in bed and when they should wake up.